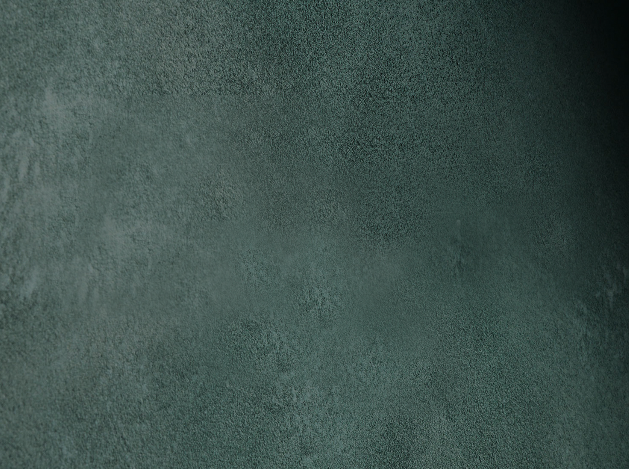
Stucco Wall’s opaque Venetian plaster is a truly unique and sophisticated decorative finish that offers unmatched elegance and versatility. Made with high-quality, lime-based materials, this finish is not only durable, but also provides a wide range of aesthetic options for your decorating needs. The slightly rough and matt surface is velvety to the touch, making it a popular choice for those seeking a premium and refined appearance in their interior spaces. The chiaroscuro effect, reminiscent of fine suede, adds a touch of depth and character, making this finish ideal for use in high-end residential or commercial projects. Overall, Stucco Wall's exclusive opaque Venetian plaster is a luxurious, versatile, and high-performing decorative option.
The development of this plaster was originally motivated by a specific requirement: to create a durable and flexible coating for the interiors of a yacht. Given the inherent movement and expansion of the wooden planks composing the sea vessel, it was crucial to find a solution that would allow for flexibility without cracking. To achieve this, we added a specific quantity of fibrous fibres, which served to increase the product’s flexibility and durability. This innovative approach has resulted in a plaster that is both elastic and resistant to cracking, making it ideal for use in environments subject to movement and fluctuation. Whether on a yacht or in other similarly demanding settings, this plaster offers a reliable, long-lasting solution for those seeking a flexible, durable, and crack-resistant coating.
Document type Technical Data Sheet
Name MARMARETTO VELVET
Description Natural, lime-based material for decorative finishes on interior and exterior wall
surfaces. Naturally anti-mould and breathable. It is one of the most elegant lime-based
decorative finishes rendering a variety of aesthetic possibilities. Its slightly rough and
matt finish is velvety to the touch with the typical chiaroscuro appearance of fine suede.
Composition Aged, slaked lime and selected marble powders.
Grain size 300 microns
Appearance Paste
Colour White, it can be tinted in any colour with lime-compatible colourants
Packaging 24 kg net polyethylene containers
16 kg net polyethylene containers
Application By hand, with a steel trowel
Type of Surface Interior and exterior walls.
New Wall Surface
Plaster: no priming necessary
Gypsum / Plasterboard / Medium Density: one coat of QUARTZ PRIMER
Old Wall Surface
Plaster: one coat of QUARTZ PRIMER
Fast drying / Limewash: brush down and apply one coat of QUARTZ PRIMER
Polished Lime: Abrade, brush down and apply one coat of QUARTZ PRIMER
Washable Paint: one coat of QUARTZ PRIMER
Dilution Ready to use
Consumption 2.1 kg/m2
Drying 3 hours at 20°C / 68°F to the touch
48 hours at 20°C / 68°F below the surface
180 days stable
Application temperatures min 5 max 30°C – R.U. < 85% ca
Coat Thickness 1.4 – 1.6 mm for a total of 3 coats
VOC Classification EU Directive 2004/42/CE: EU limit value for this product (cat A/l – water-based
decorative effect coating): 200 g/l (2010). This product contains less than 1 g/l of VOC.
Specific Weight 1.4 ± 0.2 (kg/l)
pH after 30 days 12.5 ± 0.50
Vapour Permeability SD ~ 0,04 m (DIN 52 615)
Flammability European Class of Reaction to Fire A1: non-combustible, no contribution to fire
Mould Resistance ASTM D 3274 – “Standard Test Method to evaluate the degree of surface
disfigurement of paint by microbial, fungal and algae growth.
Result: Front Panel 10/10/10 Back Panel 10/10/10 = no growth
TDS Marmoretto Velvet April 23 2 of 6
Scrub Test Resistance ASTM D 2486-06 method A = was used: scrubbing fine sand + metallic brush for
10,000 cycles
Impact Test UNI EN ISO 6272-2-2006. 1 kg doming punch was dropped from different heights and
only at the height of 8 cm., it left a 5.5 mm. dent in the surface and a tiny crack
appeared around its circumference.
Pencil Hardness ASTM D3363- Pencil hardness 5H
Shore Hardness Norm ASTM 2240 average
Adhesion Norm UNI EN 13892-8 2004 average value = 2,0
Shelf life 36 months when stored according to the recommended guidelines
Storage In original sealed packaging between 5° - 35°C in a dry, dark environment
Safety Norms Irritating. / Risk of serious damage to eyes. / Irritating to the skin. / Keep out of children.
/ Avoid contact with eyes. / In case of contact with eyes, clean immediately with water
without rubbing them, and consult a doctor. / Wear suitable gloves and eyes / face
protection. / In case of ingestion of the products, consult immediately a doctor showing
him the can or the label of the product. Danger labelling under directives 67/548/EEC
and 1999/45/EC nd following amendments and adjustments. The product must be
transported, used and stored according to current standards of hygiene and safety.
Disposal Product must be disposed of according to norms and regulations in force. Containers
must be sent for recycling. Follow directions on the packaging
Application Instructions WARNINGS
We recommend using materials from the same production batch for the same project.
If you must use different batches, we suggest mixing their material together to avoid
any slight variations in shading.
To ensure proper usage, dilution, and application of the products mentioned in these
pages, please consult the corresponding technical data sheets.
When preparing the surface and applying the materials, we advise using appropriate
tools and personal protective equipment (PPE).
During application and for the following 72 hours, protect the surfaces from sudden
temperature change, direct sun light and water. Don’t apply in temperatures below 8°C
or above 35°. During application make sure that the work area isn’t too damp to avoid
problems with application times.
Remember to have a strong light parallel to the wall and situated on only one of the
two sides of the wall you are working on (usually on the same side as other sources of
light such as windows). In this way the shadow of the trowel allows you to see the
actual state of the finish. Every so often, during the second and third coat, the light
should be moved so that the wall doesn’t dry out too much in one spot from the heat of
the lamp.
APPLICATION
Protection of the work area: Masking tape and protective material over the baseboards
and around windows and doors.
Priming: One coat of QUARTZ PRIMER is applied with roller or brush to a uniformly
TDS Marmoretto Velvet April 23 3 of 6
smooth, clean surface and allowed to dry completely (3-5 hours). It is necessary to
apply the primer on all surfaces with the exception of plasters made of lime and sand.
These have a similar composition to MARMORETTO.
Colouring: After opening the container of Marmoretto Velvet, remove any water on
the surface, and mix for about 30 seconds using an electric mixer until homogenized.
Add the colouring pigment and mix until the colour is completely uniform. Remember
that lime loses its viscosity once shaken. If the material, after mixing, is too loose, allow
it to rest for 6 to 8 hours before using.
1. FIRST COAT: Apply a thin, even coat of Marmoretto Velvet over the entire
surface with a metal trowel. Avoid making too many ridges and allow it to dry
completely (6-8 hours). The first coat can be white even if you plan too have a coloured
finish. If the final colour will be dark it is best to remove the masking tape from around
doors, windows and baseboards and reapply it; otherwise, a strip of white may be
visible when the tape is finally removed. Therefore, remove the tape and replace it
approximately 1/16” distant from the original position of the tape.
2. SECOND COAT: if you apply the second coat as evenly as possible with a metal
trowel you will get little or no dark and light effect, but if you apply it “badly”, that is with
area with more material close to areas with less, you will get more dark and light effect,
especially with dark colours. In alternative to increase the chamois effect (dark and
light), you can damp the walls lightly and not evenly just before applying the second
coat. Some areas will remain damper than others, which will result in a surface with
both smooth and rough areas after the final smoothing phase. To do this coat, make
sure the blade-edge of the trowel is always clean and free of imperfections. The edge
can be cleaned with P360 sandpaper. Usually the second coat is applied over the
entire surface before applying the third coat. But on large surfaces in hot, dry
conditions it might be necessary to have a second person begin to apply the third coat
while the first completes the second coat.
3. THE THIRD COAT should be applied before the second coat has dried completely.
To recognize when this is, you should observe that the water that was on the surface
has been absorbed, but the plaster still appears slightly damp. The second coat should
have almost completed the shrinking process that typically occurs with lime-based
products. With ideal room temperatures, this occurs after about 15 minutes, the time it
usually takes to apply the second coat to a medium-sized wall. The third coat will be
applied over this even surface. No undue care need be taken when applying it since
this final layer will be smoothed out almost immediately with a dry SPONGE FLOAT.
4. It is difficult to say how much time you need to wait before using the SPONGE
FLOAT because it depends on how absorbent the wall is and what the temperature is.
You’ll know if is too soon because you will see small ridges forming as you use the
SPONGE FLOAT. Generally, the plaster should be damp enough to be able to smooth
the surface moving the SPONGE FLOAT in opposite sweeping directions several
times. This will fill in pits and flatten ridges without leaving marks on the wall. The
SPONGE FLOAT will need to be cleaned from time to time of excess MARMORINO
which has accumulated on its surface. To do this, gently scrape the surface of the
TDS Marmoretto Velvet April 23 4 of 6
SPONGE FLOAT on the edge of a metal trowel, and then scrape the excess
MARMORETTO into a container to be reused later.
5. Before it dries completely, go over the wall with a metal or plastic trowel which has
smooth, rounded edges. As when using the SPONGE FLOAT, you will know when to
perform this phase of the smoothing process by observation. It is too early to use the
plastic trowel when you leave small ridges in the plaster and too late when you are
unable to smooth out the roughness left from using the SPONGE FLOAT. Note that
with very light colours, the steel trowel could leave a grey mark like a veil on the
surface. Because of that, it is suggested to use a plastic trowel or our BIANKO titanium
trowel.
6. The trowel should be pressed almost flat on the wall (with a 25-30° angle) moving it
in opposite sweeping directions to avoid making ridges. It is advisable to use a strong
light source parallel to the walls when smoothing out the surface to detect
imperfections you may create while moving the trowel over the surface. The wall will be
finished when it appears almost shiny when viewed against the light. You will observe -
especially with darker colours – that the smoothest parts appear the darkest.
7. Remove all tape and protective material before the plaster is completely dried to
avoid chipping and cracking along the taped edge. In fact, the tape can be removed
right before the last phase where you use the plastic trowel.
SPECIAL EFFECTS
This versatile material can achieve several special effects:
Veiled effect
Once it is completely dry, the finish can be given a distinctive colour patina using our
water-based VELATURA. This transparent liquid product can be tinted in any colour
allowing you to obtain a variety of effects from an antique patina to an artistic look with
a strong visual impact. It is always advisable to try out the colour on a sample board or on
part of the wall which is not so visible. Our metallic glitter or pearlescent waxes can also be
used to get veiled effects.
Damask effect
A Damask effect can be obtained by applying a very thick second coat of Marmoretto Velvet
and passing over it immediately with a completely flat, metal trowel always
moving in the same direction (orizzontali or vertically). Ridges will be formed in this way
which should then be pressed down lightly with a plastic or metal trowel before drying.
Other Effects
You can use a metal trowel instead of a plastic one in the final phase of the smoothing
process to leave dark marks on the finished surface. These are transferred from the metal
trowel to the smoothest areas. This effect is used mostly on dark finishes. To make the finish
feel more velvety to the touch, you can sand the surface lightly (not before 48 hours from
TDS Marmoretto Velvet April 23 5 of 6
drying) with paper P 220-360 (this moves up the cellulose fibers) and then brush off the
dust.
EXTERIORS:
For exterior applications there are some rules to respect and some
precautions to take. We remind you that carbonation, i.e. the process that takes place
through the absorption of atmospheric CO2, is completed in a few hours on the surface
but takes several days to take place in depth. It is therefore important that the
application takes place in the certainty of the absence of heavy rains in the three
following days. It is also not recommended to apply it on walls that do not have at least
a small roof overhang. Penetrating rain could ruin the finish even after weeks as deep
carbonation is completed after more than a month. Avoid windy days, especially at high
temperatures, as well as the risk of frost in the 48 hours following application. In
external applications in hot climate conditions, it is also recommended to protect the
wall from the sun with shade cloths applied to the scaffolding. Lime-based products
must dry slowly to better fulfil their characteristics.
Finish Protection
(optional)
INTERIOR: PROTECTIVE WAX / HYDROCALCE / SOFT TOUCH
EXTERIOR: HYDROCALCE
A protective treatment is optional in most circumstances. It is however necessary in
bathroom walls, kitchen, and splashback walls. On exteriors, protective treatments are
obligatory only in highly polluted cities.
On Interiors, one of the following options can be chosen:
A) Apply our PROTECTIVE WAX which guarantees waterproofing and protection
against all types of dirt. There are two kinds available: MATT and GLOSSY, which
increases shine on Marmoretto Velvet. Apply it, diluted to 70-100% with water,
preferably with a spray bottle.
B) Apply HYDROCALCE after about 72 hours at at least 20°C., proceed with the
application of the colourless protective impregnation HYDROCALCE, especially
designed for the protection of lime-based coatings. Its Installation is done by brush in
two coats, with a consumption of about 100-130 g/sqm.
C) SOFT TOUCH, a one-component water-based polyurethane varnish with a soft
touch effect can be use to protect Marmoretto Velvet while providing an enhanced
velvety touch
Exteriors
This finish, as all lime-based plasters, absorbs water during rainy weather, which
results in a temporary "wet effect" on the surface. However, this plaster releases the
absorbed water within a few hours, allowing the surface to dry without any damage nor
alteration to the finish. While a final treatment is therefore optional, it is highly
recommended in areas with high pollution levels or if you wish to avoid the temporary
wet effect that can occur after rainfall. To protect the finish, after at least 72 hours at a
minimum of 20°C, proceed with a colourless, penetrating HYDROCALCE, developed
to protect exterior plaster coverings.
TDS Marmoretto Velvet April 23 6 of 6
Maintenance To clean natural finishes with no protection: The most practical way to clean this type
of finish is with a white pencil’s rubber eraser or sandpaper (P 220-320). It’s very easy
to clean most dirty areas by simply using sand paper and dusting off the powder
residue.
Tools SI TROWEL, SCRAPERS, SPONGE FLOAT VELVET
Clean with water immediately after use
Decorative complements
(optional)
VELATURA
We have drawn up the material presented above to the best of our technical and experiential knowledge. Nevertheless,
our suggestions and recommendations are not guaranteed. All responsibility for the obtained results lies solely with the
method and conditions adopted for the application of the product. Such indications constitute valid support for verifying
the product's suitability for the specific case. We reserve the right to make modifications to the present information